The excellent outdoor adventure blog, Bearfoot Theory, has published their quintessential guide to lightweght backpacking gear. Some of our favorite brands made the cut!
Read more: Best Lightweight Backpacking Gear (Bearfoot Theory)
Gear Junkie was kind enough to lay out the top 15 gifts for this holiday season, as chose by Campmor "Gear Experts".
We come across all kinds of survival gear & gadgets, some great, some not so much.
Outside Online has coverage of this Kickstarter project, Parawallets. While they're final conclusion is that it's a 'silly' survival product, any time you can carry a basic fire starter + 50ft of paracord on your person, it's a good start to a basic kit. We're fans of any survival item that can be a daily-carry. Here's hoping the project gets funded!
Living Overland is great at covering basic needs of the outdoor explorer: food, gear, navigation, vehicle modifications, and other related articles.

This review of the not-for-the-faint-of-heart (or wallet) dp1 Quattro camera from Sigma is a perfct example: Great detailed information about a camera many of us can't afford, but will pine after for weeks and months.
While it's not for everyone, if you're looking for a lightweight camera with impeccable image quality, it's worth a look.
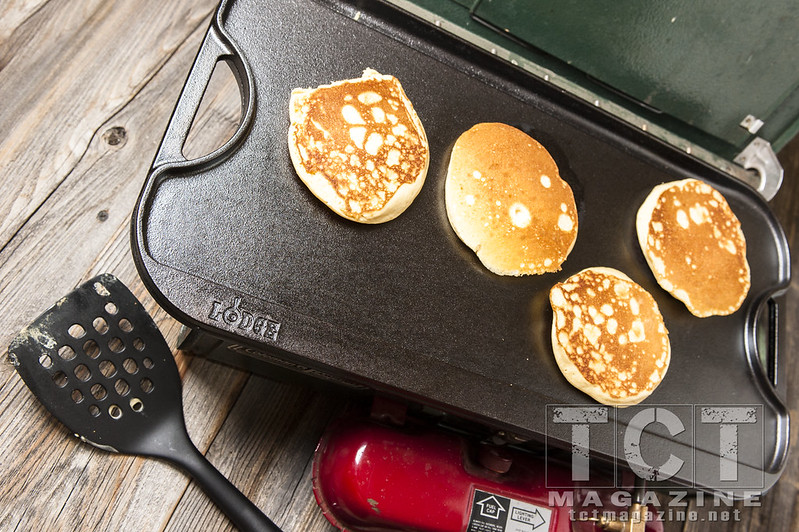
TCT Magazine just published a comprehensive comparison of the best griddles for your dollars for use when car camping (or 'overlanding' if you do that). They've included a variety of options so you're sure to find the perfect camping griddle.
For just $75, the Lodge Cast Iron griddle seems to be a winner for most uses!
Elevation Outdoors magazine posted a great little article to help you find the perfect gift for your pooch this year.
Our favorite? The $11 Nite Ize Nite Dawg Led Collar Cover, it's perfect for walking & exploring in the darker winter months.
Patagonia put together a nice short film featuring some of their gear that's been well used for decades. It's really great to see equipment & clothing that can be used for more than one or two seasons, and most Patagonia gear fits the bill quite nicely.
 As you know we're alwasy looking for great quality clothing for the adventure lifestyle. To be completely honest, I'm kind of over standard ultralight (not very durable) backpacker style clothing. While ultra lightweight pants & shirts have their place when on a 5 day wilderness adventure, my daily adventures of taking care of kids and spending time in our FJ Cruiser tend to be very hard on my clothes. I've worn out more than one set of zip-off backpacking pants, and my lightweight button-up shirts always either get stained or ripped on a tree.
After the Vehicle Based Survival course I instructed last week, I thought it would be a good idea to briefly discuss the absolute essentials any adventurer should travel with, in terms of short term survival.
As you may know, surviving for the short term (usually less than 5 days), only really requires two things: hydroregulation (keeping your core temperature at or around 98.6F), and hydration. To this end, I recommend the following for a MINIMAL survival kit:
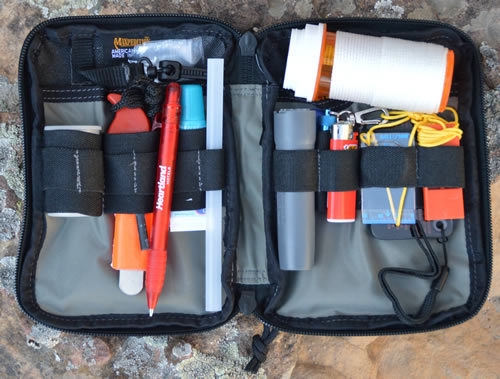 Water purification: this can come in the form of a backpacker-style pump that you already have, UV purifier, or survival-straw, but most likely you’ll want to carry water purification tablets.
- Emergency shelter: can either be a generic Mylar blanket, or a more advanced emergency bivy or heavy-duty space blanket.
- Fire starter: while fire is not always absolutely necessary during a short term survival ordeal, it enhances every other aspect of your situation. It provides warmth & drying abilities, cooks food, purifies water, and often helps keep critters away. I carry a Blast-Match and petroleum jelly-cotton ball tinder.
- Communication: The most basic survival communication method is a Personal Locator Beacon, but they can be pricey. Many adventurers choose to use a SPOT Messenger for emergency comm. In addition to the SPOT, I usually carry 1-2 ham radios as well as various short distance devices such as a whistle, flare, and signal mirror.
Choose one item from each category and you’ll be well on your way to building a decent basic survival kit.
 As winter starts to swing into gear, now may be a good time to think about new skis for the 12-13 season. REI put together a great little list of things to think about when out shopping for new sticks.
Our list basically comes down to:
- Budget: We can only afford so much ski, with fuel bills so high from exploring Colorado resorts
- Features: The feature set will depend on the type of terrain you love and local conditions
- Skier ability: There is such thing as 'too much' ski
- Dependability: With a growing family, and many friends that love to ride, our skis don't always stay safe in the Thule rack. Not to mention a rock or two in early season conditions.
REI's post has some great tips to think about.
Source: REI Blog
 Elevation Outdoors (www.elevationoutdoors.com) wrote an article yesterday covering NiteRider rechargeable lights for biking (LINK). While the LED light that can last 25 hours (on dim) with amazing brightness certainly sounds cool, we're just not sure it's worth the $350 price tag.

A quick search on Amazon yielded several options from 'casual' lights to the aptly named 'Blaze'. While admittedly none of these options is as bright as the NiteRider, that $350 can buy a lot of lights AND a lot of rechargeable batteries.
It really comes down to what your needs are. A professional night rider may shell out the $$$ for an 1800 lumen light, but for the vast majority of us, a $50 light and plenty of batteries will do just fine.
 Perfect day for learning to surf in Bondi Beach, Australia
The first mistake that people make who are new to the sport of surfing is attempting to buy a board way too small. As a surf shop manager, I have seen it happen time and time again. If you plan on getting into the sport (and you should!), it is wise to invest in a well built surfboard. Renting a board on a regular basis can get pricey very quickly, and it is good to have a consistency in a board while learning how to handle it in the water. If this is your first go at the sport, do not be fooled by watching experienced surfers, and then thinking it is easy. It takes time, commitment and the right gear. Size Matters A board under 6'6 is not conducive to learning how to surf. As a beginner, I suggest a board that is at least 7 foot tall, around 20 inches wide and 2 1/2 inches thick. When maneuvering yourself through the surf, buoyancy is your best friend. It provides more floatation for paddling and a more stable platform while standing up and riding. If you have a smaller board, you will be more submerged in the water, and therefore your paddling efficiency will be lost. Something that you cannot afford to lose. As a general rule, I would recommend a board between 7 feet to 8 feet long. Material While learning the sport, you will undoubtedly bang your board up a bit. I suggest purchasing a used board. They are less expensive and work just the same. Surfboards are made with several materials. The newest and most durable technologies are the tuflite/PVC materials. It is a bit less expensive to produce, more durable and lighter weight. This is a great combo for a first time buyer. However, the size and shape is more important. Go with what fits your budget, but get the right size. Where to buy Its always good to support your local shop. If they have attitude then leave, or ask for someone else. Retailers should be helpful and kind. They usually offer a decent selection of used boards, but the mid length (7-8 feet) often sell quickly. Don't be shy and stop by often to see whats in stock, as it changes nearly every day in the summer time. Post any questions you have on our Facebook wall; we'd be happy to answer. Good luck and have fun!
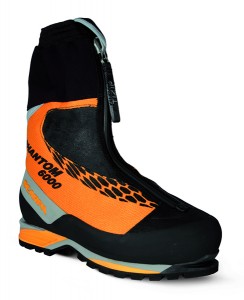 Scarpa Phantom 6000 -- double mountaineering boot
Double Boots
Double are similar to ski boots in design in that they have a mold-able liner with a stiff plastic or waterproof or stiff waterproof shell. These boots are most commonly used for technical mountaineering in extreme environments, like K2 or Everest but may be employed by weekend warriors who struggle with cold feet during multi-day trips. Consult an expert if you feel you need these boots and aren’t sure what to get.Mountaineering Boots
These boots are designed for mountaineering in slightly less demanding conditions than double boots. They can range from the equivalent of heavyweight hiking boots to heavier boots designed for vertical ice and more serious mountaineering. Whereas heavier, stiffer boots perform better on snow and ice, they are less useful on the trail, and (perhaps not surprisingly) boots that perform better on the trail are less suited to the rigors of steep snow and ice. So, your intended use will determine the type of boot you need. Once you have decided on the type boot that fits your adventure needs, you should head to your local outfitter with the socks you plan on wearing. Try on several different pairs to ensure you find the fit that is best for you. While some manufactures still use leather which offers a faster break-in (but more maintenance to keep waterproof and conditioned), many are moving to high performance synthetic materials for most boots.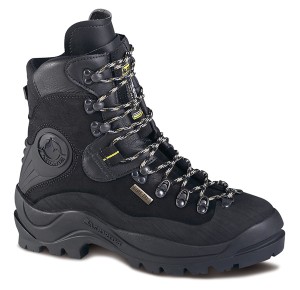 La Sportiva Lhotse -- heavyweight mountaineering boot
Heavyweight Mountaineering Boots
Heavyweight mountaineering boots are designed for spending lots of time on vertical ice (WI4 and above), steep snow and ice, and in truly cold conditions. A full shank will make these boots extremely stiff but allow you to use automatic or step-in crampons with ease. The shank and the high cuff will make climbing vertical ice much easier. Generally these boots are extremely waterproof and well insulated, which of course adds up to a very stiff, heavy boot. Although this is ideal in a boot if you plan on serious mountaineering, the weight and difficult break-in period keep make it a less-than-practical boot for peak baggers and weekend backpackers.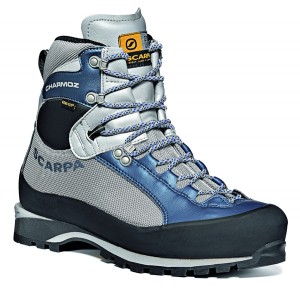 Scarpa Charmoz -- medium weight mountaineering boot
Mid-weight Mountaineering Boots
Mid-weight mountaineering boots are designed for hiking in cold temperatures and backpacking. Some models may have a half shank to allow use of automatic or step-in crampons. These boots can be used for less than vertical ice climbing (up to WI3). Mid-weight mountaineering boots are also ideal for moderately cold weather mountaineering while still offering the adequate flexibility and reduced weight to be comfortable on the trail. This is probably the ideal boot for budding mountaineers. Asolo Lothar -- lightweight mountaineering boot
Lightweight Mountaineering Boots
Lightweight mountaineering boots are ideal for winter hiking, backpacking with large loads, cold peak bagging and approaches. Although they can be used with snowshoes and are generally stiff enough to accept strap-on crampons for limited snow and ice travel they excel on the trail, they often provide less stability over snow, ice, and very rough terrain and therefore should be reserved primarily for trail use when you don’t expect much, if any, snow or ice. Many boot models in this category are made of leather and use other (primarily synthetic) fabrics for the side panels. The result is a reduction in weight and price but typically at the expense of stability, water resistance and durability. Although some manufactures offer Gore-Tex-treated models, many will require using a third-party waterproofing treatment, such as Nikwax.Break-in and Boot Maintenance
The break-in can be a bit of a love, hate process. Lightweight boots have a relatively quick break-in period, whereas mid-weight boots may require on the order of 100 miles of wear for an adequate break-in. Heavy mountaineering boots may require as much as 200 miles of wear for that comfort fit, during which time it’s as much you breaking in the boots as the boots breaking you in (see sidebar for blister treatments). Experimenting with different sock combinations can ease some of the pain, but for the most part it is just a process you need to endure. That said, make sure you tough it out before heading into the backcountry. Boots that have not been broken in have no place on the mountain, trail or ice. It’s worth spending a lot of time getting to know your boots. Even prior to making your purchase, do more than just take a quick ‘up and back’ in the store. Ask the clerk if you can spend some more time walking around the store in the boots you’re considering, do the rest of your shopping in them (I mean, it’s not like we ever go to an outdoor equipment store for just one thing, right?). If you have any discomfort after an hour it spells disaster for multi-day trips. Or, at the very least, it suggests that a different brand of boot is going to be better long term. If you need to help speed up the break-in time, look into custom foot beds, but don’t skip the pre-purchase comfort test. With proper care, most well-made mountaineering boots will last a lifetime. After every trip inspect, clean and dry your boots. First, clean off large debris and dirt with a stiff brush. Next use a gentle soap such as saddle soap or Nikwax Cleaning Gel according to manufacturer’s instructions. Allow to dry away from any heat source as heat can damage the leather and liners. If additional waterproofing is required follow the manufacturer’s instructions.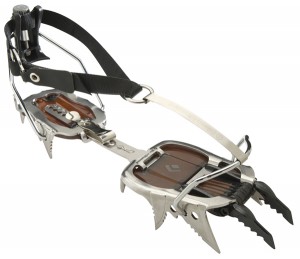 Black Diamond Cyborg crampon with automatic bindings
Compatibility With Crampons
Boots may have a welted heel, welted toe, or both. A boot with a heel welt can accept hybrid crampons while a boot featuring both welted heel and toe will accept automatic (or step-in) crampons. Boots lacking welts will require strap-on crampon bindings.Crampon Bindings
There are three main types of crampon bindings. The type of crampon binding you decide on will be decided by your boot type. (see left) Step-in Crampons -- require a stiff boot with welts on the toe and heel. On the heel a lever keeps the crampon tight to the boot while a front bail fits into the toe welt. These are generally used on mid and heavyweight boots with a half or full shank. Hybrid crampons -- require a heel welt but do not need one on the toe. Instead a toe strap holds them in place on the toe. Strap-on crampons -- can be affixed to almost any boot. They are simply help to the boot using nylon webbing.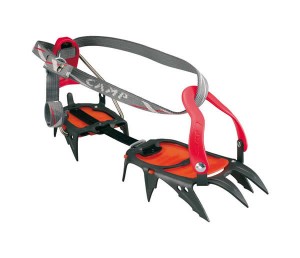 C.A.M.P. C12 crampon with hybrid bindings
Crampons
Crampons are boot attachments that feature metal spikes to provide traction on snow and ice. They come in different configurations, are made of different materials, and have different methods of attaching to boots. It’s a good idea to take you boots with you when purchasing crampons. While most stores will be able to get you a crampon you can take home and affix to your boots there is peace of mind that comes with leaving the store knowing you are ready to start your adventure. Again, the type and binding of crampon you settle on will be decided by their intended use.Crampon Types
Rigid crampons -- are designed for climbing vertical ice (WI4 and above). The crampons are constructed to provide no flex and therefore may take some time to get used to and are not suitable for trail use, but they provide the most stable platform when front-pointing vertical ice. Semi-rigid -- crampons provide some flex --- essential for walking on icy trails or glaciers -- yet they will also provide a stiff platform for climbing less-than-vertical steep ice (up to WI3). This balance of walking and climbing performance makes this style of crampon the best choice for general mountaineering (and also the most common type of crampon available). Flexible crampons -- are generally attached to the boot with straps and are the most comfortable crampon for walking on icy trails because they allow the user to maintain a relatively normal stride. They do not, however, provide any stability for climbing and thus are best suited for occasional use on low grade terrain.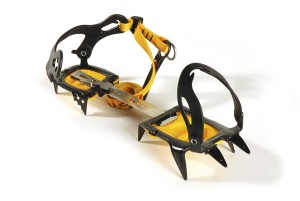 Grivel G10 crampons with strap-on bindings
Materials
Crampons are generally made from a high-strength steel alloy and will last many seasons with proper care. There are also crampons made from lightweight aluminum that are best employed for occasional use -- a multi-day trip where crampons will be needed near a summit but you don’t want to be carrying steel in your backpack for the remainder of the trek.Points
Good crampons will generally have between 10 and 14 points. 10 point crampons are generally reserved for occasional use, whereas general mountaineering crampons will normally have 12 points, and crampons designed for climbing vertical ice will typically have 14. The point orientation will also have an effect on the utility of the crampon for specific applications. Mountaineering crampons will normally have two horizontal front points and the second row will be more vertical allowing good penetration in ice while walking. Crampons designed for ice climbing may have one or two front points orientated vertically for strength with the second row angled toward the toe to make front-pointing easier.Crampon Maintenance
Crampons will last many years with proper care. Always inspect your crampons before and after each trip and repair or replace damaged linking bars, straps or bails. Sharpen points with a hand file as they dull. Carrying a hand file with you on long trips may be necessary.More Articles …
- Quick Review: Chuck-it Bumper
- Winter Gift Guide 2011
- New & Noteworthy -- Backcountry Bar
- Patagonia Better Sweater Review
- Osprey Flap Jack Courier Review
- Mountain Hardwear Medusa Gloves Review
- New & Noteworthy - Spring 2011
- Climbing Shoe Buyers Guide
- MSR Lightning Ascent
- Feathered Friends Daybreak Jacket


